#how to create clipping path in photoshop
Explore tagged Tumblr posts
Visit Tumblr Blog
Explore Tumblr blogs with no restrictions, modern design and the best experience.
Last Seen Tumblr Blogs


Fun Fact
The KCSC sent more than 20K requests to delete posts related to prostitution and porn to Tumblr from January to June 2017.
Text
🚀 Superfast Cut-Out Images and Background Removal 🌟
Experience the lightning-fast solution to cut-out images and remove backgrounds for your photos! We understand that time is of the essence, and that's why we offer a superfast service that doesn't compromise on quality.
Why Choose Us?
⚡ Rapid Turnaround: We take pride in delivering results at warp speed, ensuring that your project is completed in record time.
✔️ Precision and Quality: Speed doesn't mean sacrificing quality. Our expert team maintains the highest standards to make your images stand out.
💬 Clear Communication: We streamline the process, making it quick and easy for you to submit your images and get the results you need.
💯 Client Satisfaction: Your happiness is our priority, and we guarantee your satisfaction with every project.
💰 Competitive Pricing: Enjoy swift, professional services at rates that won't break the bank.
Our Services:
✂️ Background Removal: We'll cleanly cut out backgrounds, giving you the freedom to add your desired setting or leave it transparent.
🌈 Image Enhancement: We ensure your subject looks its best, enhancing colors, sharpness, and overall quality.
🖼️ Customized Solutions: No two projects are the same. We cater to your specific needs, offering tailored results.
Get Started: Ready to experience the superfast difference? Contact us today, share your project details, and watch your images transformed in no time. We're here to meet your deadlines and exceed your expectations.
🌠 Speed Meets Quality: Don't wait when you need to make your images pop. Contact us now and let's create a visual impact like never before!
Customize this description to reflect your specific services and unique selling points. The key is to highlight the speed and quality of your cut-out image and background removal services while assuring potential clients of your commitment to delivering top-notch results.
Get Started
#clipping path#clipping path in illustrator#css clipping path#how to make a clipping path in illustrator#clipping path service#make clipping path illustrator#svg clipping path#clipping path in photoshop#clipping path services provider#create clipping path indesign#indesign clipping path#clipping path service providers#clipping path india#how to create a clipping path in illustrator#clipping path adobe illustrator#what is clipping path#clipping path company#image clipping path service#best clipping path service#clipping path expert#clipping path companies#asian clipping path#how to make a clipping path in photoshop#photo clipping path#create clipping path photoshop#how to create clipping path in photoshop#offshore clipping path#clipping path service provider company#clipping path picture#how to create a clipping path in photoshop
0 notes
Text
clipping path and background just pen tool
#clipping path#pen tool#clipping path tutorial#clipping path service#how to use pen tool#image clipping path#pen tool photoshop#clipping path tutorial in photoshop#background remove#clipping path photoshop#create clipping path#jewelry clipping path#clipping path tutorial in photoshop bangla#photoshop clipping path tutorial#remove background#use pen tool#background remove & clipping path pen tools use#clipping path bangla tutorial#product clipping path
0 notes
Text

Someone asked me how I created the fade transition in this gifset which I’ll try to explain in the most comprehensive way that I can. If you've never done something like this before, I suggest reading through the full tutorial before attempting it so you know what you'll need to plan for.
To follow, you should have:
basic knowledge of how to make gifs in photoshop
some familiarity with the concept of how keyframes work
patience
Difficulty level: Moderate/advanced
Prep + overview
First and foremost, make the two gifs you'll be using. Both will need to have about the same amount of frames.
For ref the gif in my example is 540x540.
I recommend around 60-70 frames max total for a big gif, which can be pushing it if both are in color, then I would aim for 50-60. My gif has a total of 74 frames which I finessed using lossy and this will be explained in Part 4.
⚠️ IMPORTANT: when overlaying two or more gifs and when using key frames, you MUST set your frame delay to 0.03 fps for each gif, which can be changed to 0.05 fps or anything else that you want after converting the combined canvas back into frames. But both gifs have to be set to 0.03 before you convert them to timeline to avoid duplicated frames that don't match up, resulting in an unpleasantly choppy finish.
Part 1: Getting Started
Drag one of your gifs onto the other so they're both on the same canvas.
The gif that your canvas is fading FROM (Gif 1) should be on top of the gif it is fading INTO (Gif 2).

And here's a visual of the order in which your layers should appear by the end of this tutorial, so you know what you're working toward achieving:

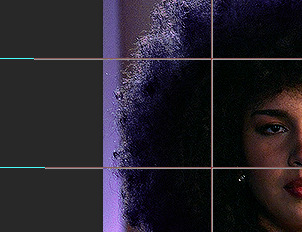
Part 2: Creating the grid
Go to: View > Guides > New guide layout
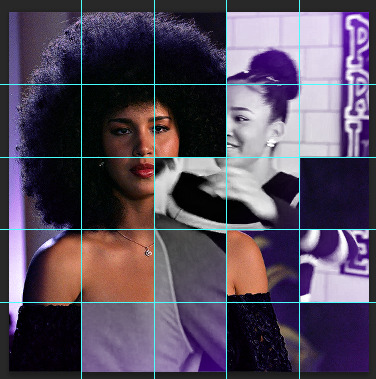
I chose 5 columns and 5 rows to get the result of 25 squares.

The more rows and columns you choose, the more work you'll have to do, and the faster your squares will have to fade out so keep that in mind. I wouldn't recommend any more than 25 squares for this type of transition.

To save time, duplicate the line you've created 3 more times, or as many times as needed (key shortcut: CMD +J) and move each one to align with the guides both horizontally and vertically. You won't need to recreate the lines on the edges of the canvas, only the ones that will show.
After you complete this step, you will no longer need the guides so you can go back in and clear them.

Follow the same duplicating process for the squares with the rectangle tool using the lines you've created.
Align the squares inside the grid lines. The squares should not overlap the lines but fit precisely inside them.
This might take a few tries for each because although to the eye, the squares look all exactly the same size, you'll notice that if you try to use the same duplicated square for every single one without alterations, many of them will be a few pixels off and you'll have to transform the paths to fit.
To do this go to edit > transform path and hold down the command key with the control key as you move one edge to fill the space.
Once you're done, put all the squares in their separate group, which needs to be sandwiched between Gif 1 and Gif 2.

Right click Gif 1 and choose "create clipping mask" from the drop down to mask it to the squares group. This step is super important.
After this point, I also took the opacity of the line groups down to about 40% so the lines wouldn't be so bold. Doing this revealed some squares that needed fixing so even if you aren't going dim the lines, I recommend clicking off the visibility of the lines for a moment to make sure everything is covered properly.

Part 3A: Prep For Key framing
I wanted my squares to fade out in a random-like fashion and if you want the same effect, you will have to decide which squares you want to fade out first, or reversely, which parts of Gif 2 you want to be revealed first.
In order to see what's going on underneath, I made Gif 1 invisible and turned down the opacity of the squares group.

If you want text underneath to be revealed when the squares fade away, I would add that now, and place the text group above Gif 2, but under the squares group.

Make a mental note that where your text is placed and the order in which it will be revealed is also something you will have to plan for.
With the move tool, click on the first square you want to fade out. Every time you click on a square, it will reveal itself in your layers.
I chose A3 to be the first square to fade and I'm gonna move this one to the very top of all the other square layers.
So if I click on D2 next, that layer would need to be moved under the A3 layer and so on. You'll go back and forth between doing this and adding key frames to each one. As you go along, it's crucial that you put them in order from top to bottom and highly suggested that you rename the layers (numerically for example) which will make it easier to see where you've left off as your dragging the layers into place.

Part 3B: Adding the Keyframes
This is where we enter the gates of hell things become tedious.
Open up the squares group in the timeline panel so you can see all the clips.
Here is my example of the general pattern that's followed and its corresponding layers of what you want to achieve when you're finished:

So let’s try it!
Expand the control time magnification all the way to the right so you can see every frame per second.

As shown in Part 3A, select your first chosen square.
Where you place the time-indicator on the panel will indicate the placement of the keyframe. Click on the clock next to opacity to place your first keyframe.

Move the time-indicator over 3 frames and place the next key frame.

Things to consider before moving forward:
Where you place your very first keyframe will be detrimental. If you're using a lot of squares like I did, you may have to start the transition sooner than preferred.
If you're doing 25 squares, the key frames will have to be more condensed which means more overlapping because more frames are required to finish the transition, verses if you're only using a 9-squared grid. See Part 4 for more detailed examples of this.
The opacity will remain at 100% for every initial key frame, and the second one will be at 0%.

Instead of creating two keyframes like this and changing the opacities for every single clip, you can copy the keyframes and paste them onto the other clips by click-dragging your mouse over both of them and they'll both turn yellow. Then right click one of the keyframes and hit copy.
Now drop down to your next clip, move your time-indicator if necessary to the spot where the first keyframe will start and click the clock to create one. Then right click it and hit "paste".


Tip: When you have both keyframes selected, you can also move them side to side by click-dragging one of them while both are highlighted.
Your full repetitive process in steps will go as follows:
click on square of choice on the canvas
drag that square layer to the top under the last renamed
in timeline panel: drop down to next clip, move time-indicator tick to your chosen spot for the next keyframe
create new keyframe
right click new keyframe & paste copied keyframes
repeat until you've done this with every square in the group
Now you can change the opacity of your squares layer group back to 100% and turn on the visibility of Gif 1. Then hit play to see the magic happen.
PART 4: Finished examples
Example 1

the transition starts too soon Cause: initial keyframe was placed at frame 0
the squares fade away too quickly Cause: overlapping keyframes, seen below. (this may be the ideal way to go with more squares, but for only 9, it's too fast)

Example 2

more frame time for first gif
transition wraps up at a good point Cause: in this instance, the first keyframe was placed 9 frames in, and the keyframes are not overlapping. The sequential pair starts where the last pair ended, creating a slower fade of each square.


Part 5: Final Tips and Saving
You can dl my save action here which will convert everything back into frames, change the frame rate to 0.05 and open the export window so you can see the size of the gif immediately.
If it's over 10gb, one way to finesse this is by use of lossy. By definition, lossy “compresses by removing background data” and therefore quality can be lost when pushed too far. But for most gifs, I have not noticed a deterioration in quality at all when saving with lossy until you start getting into 15-20 or higher, then it will start eating away at your gif so keep it minimal.

If you've done this and your gif is losing a noticeable amount of quality and you still haven’t gotten it below 10mb, you will have no choice but to start deleting frames.
When it comes to transitions like this one, sometimes you can't spare a single frame and if this is the case, you will have to return to the timeline state in your history and condense the key frames to fade out quicker so you can shorten the gif. You should always save a history point before converting so you have a bookmark to go back to in case this happens.
That's pretty much it, free to shoot me an ask on here or on @jugheadjones with any questions.
#gif tutorial#photoshop tutorial#transition tutorial#grid tutorial#usergif#ps help#tutorials#tutorials*#resources*#requested
402 notes
·
View notes
Text
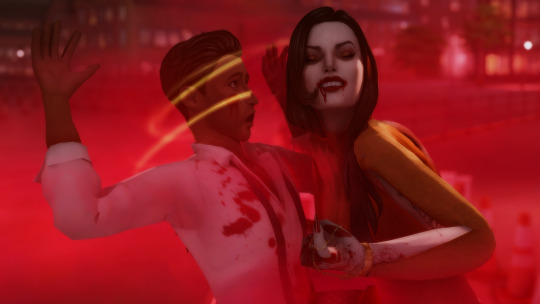
I thought it might be fun to do a little behind the scenes for the last story post! You guys might be surprised how little actual editing was involved. I mainly just crop, add brightness and saturation, clean up any small bits of clipping or weirdness that bother me, and then add captions! Do you want to know what actually took me the longest?
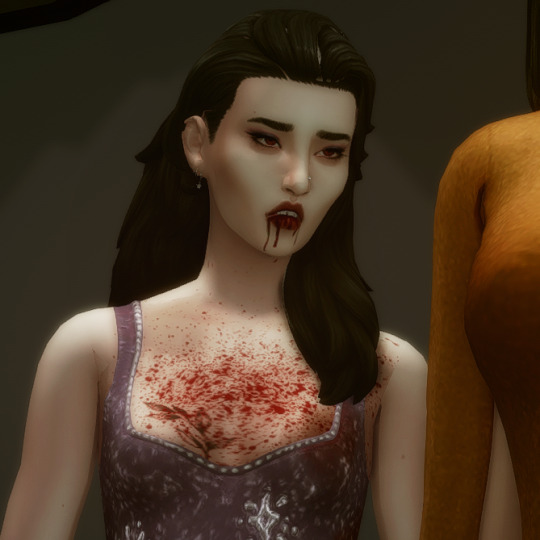
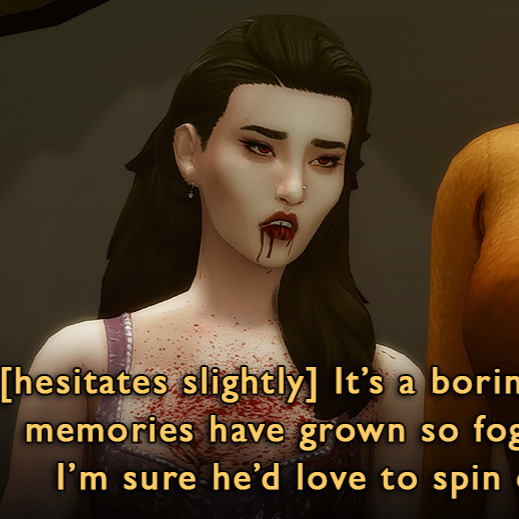
This hair had some problem areas that showed up in live mode but not CAS. It's such a tiny thing, but it annoyed me, so I had to touch it up in nearly every screenshot. Luckily, the darkness of her hair means I didn't have to do a perfect job.
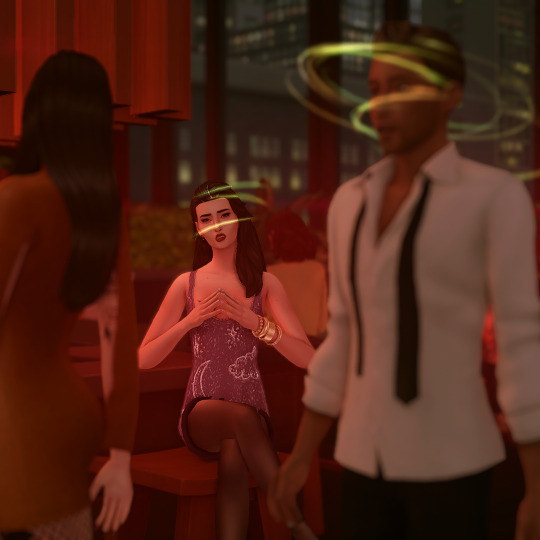
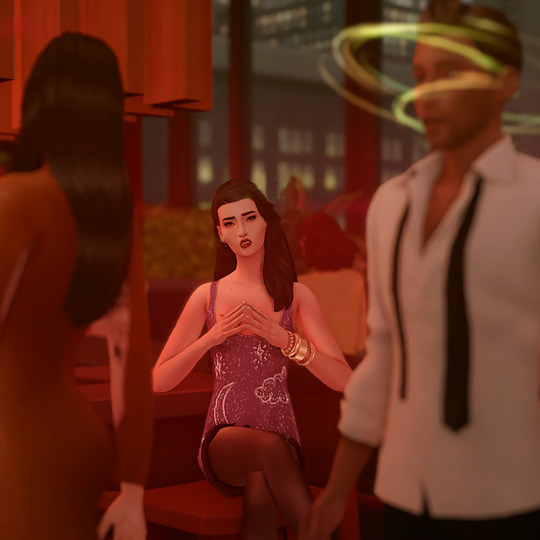
The effects were all done in-game. Lilith has the alluring visage vampire perk, which creates the red haze and mind control spiral. Unfortunately, Helena crossed her path too closely, and rather than set the shot up again I used the clone brush in Photoshop to edit out the effects around her head (vampires who can successfully do mind control on other vampires are exceedingly rare). By the way, I later figured out a quick and dirty method for dispelling unwanted visual effects on a Sim is to remove buffs in MCCC.
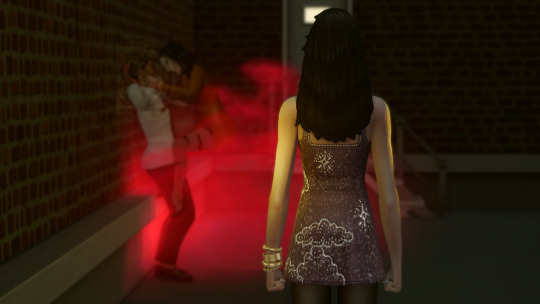
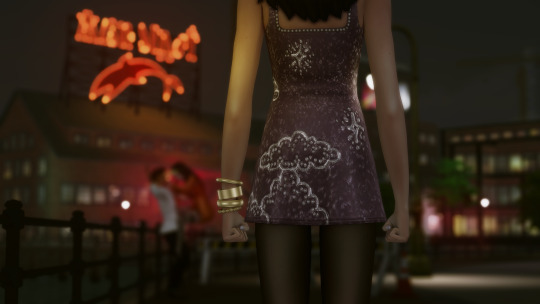
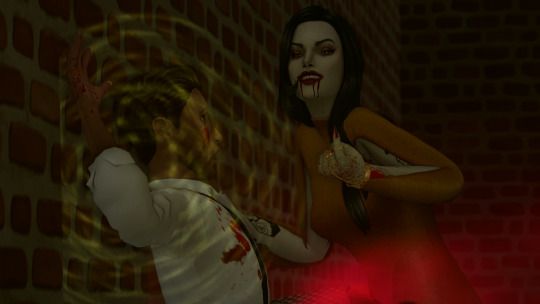
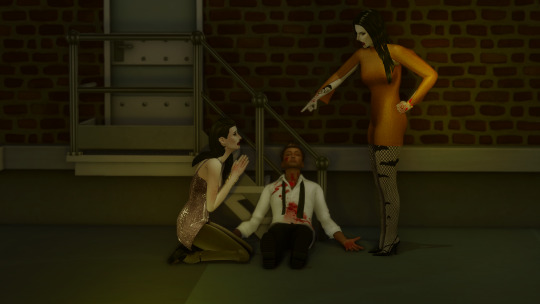
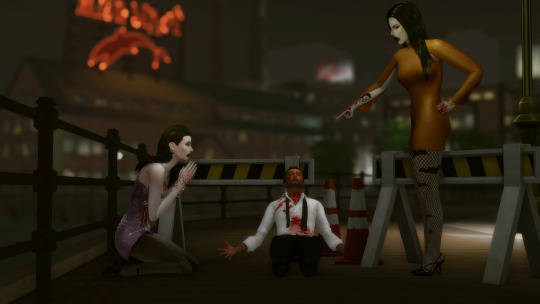
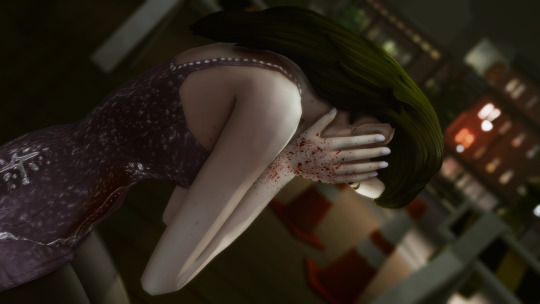
As I've mentioned, I had to shoot the attack scene twice. The first attempt was too dark, the location wasn't very visually interesting, I was in an area of San My where I had less camera control, and I used the Effects Player, which ended up being less eye-catching (hey, sometimes vanilla is the best option!). They would have worked to get the point across, but I think you can really see how I learned and improved upon my vision!
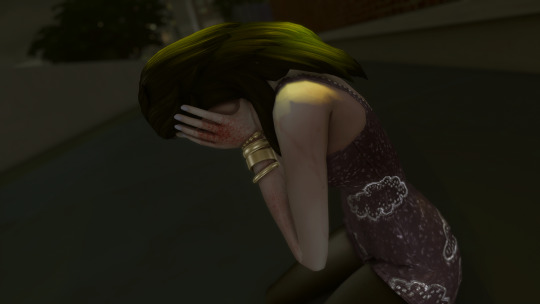
These comparison shots are all uncropped and unedited, by the way. Reshade/Relight truly does the heavy lifting. I've also gotten better at finding an angle I like and sticking with it, even if that's only because I don't want to adjust Relight all over again, lol! Speaking of angles, that last shot was done using the Dutch angle trick I learned in this tutorial by @surely-sims! First-person camera is actually super useful for storytelling. If you don't already know about this head-turning trick, it'll change your life. It comes in clutch for changing the eye line of a posed Sim since I'm not always great at getting that right in Blender.
Anyway, I don't know if anyone will find this super helpful or interesting, but I'm always open to questions about taking and editing screenshots, even though I feel like most of what I know has just been absorbed through osmosis and trial and error!
#ts4#sims 4#the zhaoverse#long post#i didn't even talk about the gifs but they were as simple as simple gets lol#i just saved the camera position in tab mode (ctrl + 5-9)#took two pictures from that angle#and then faded one shot into the other#all you need is the most basic gif making tutorial you can find#i use photoshop but i'm sure there are easier ways to do it#blood tw
64 notes
·
View notes
Text
here's my quick tutorial for making layouts in photoshop! i'll be going over how to make this 4-panel square one! ↳ requires basic knowledge of photoshop
「 step 1: making your file 」 make a new file, 540 x whatever height you want (just make sure it fits within tumblr’s image size guidelines), and make sure the background is set to transparent. for this specific layout, i want the overall shape to be square, so my dimensions are 540x540!

「 step 2: mapping out 」 the best way to make sure your layouts are even and spaced equally is using guides! go to view > guides > new guide layout. the color of your guides doesn’t matter at all (i just like green so mine are green lol), and you can have as many columns and rows as you want. since this is going to be a 2x2 layout, i’ll have 2 columns and 2 rows. the general rule of thumb for gutter is 4px.

once your guides pop up, select the rectangle tool by pressing U on your keyboard. make sure shape is selected from the drop-down menu at the top (right by the home button in the top left), and make sure that you have snapping on (view > snap).
using the rectangle tool, trace out your layout panels! as long as you have snapping on, your path should naturally snap to the guidelines, making it a LOT easier to do this! when you’re done making your rectangles, you can turn off guides by going to view > guides > clear guides (i usually keep them on until i’m done adding in my gifs but this is up to you). i always name each shape layer after where it is in the grid to not get confused.


「 step 3: adding gifs 」 some quick things before i go over actually adding in your gifs: 1. make each of your gifs in their own individual files. you’ll be adding them into the main one later. 2. your gifs have to be the same length — you can cut them down to length in their own individual files or later in the main one. either way is fine, totally up to you!
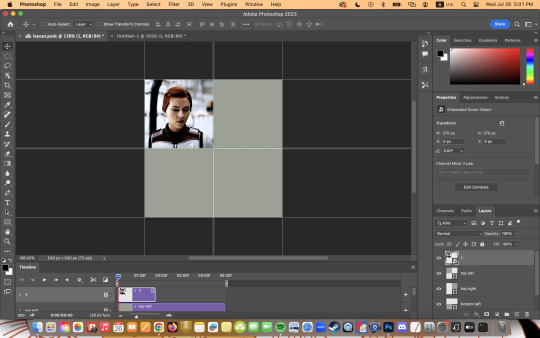
now you have your layout set up, you can make and add your gifs! in order to make sure that they fit into the panels, check the dimensions of each shape you’ve created by selecting the layer and looking in the properties tab. my panels are each 268x268.

i’ll actually be making each of my gifs 270x270, just to make sure that i don’t have any weird gaps or anything (i’ll talk about how i’ll be getting rid of the 2 extra pixels on each side later).
once you have your gifs done, you can duplicate them into the main one. convert your gif and anything else (coloring etc) into a smart object (right click > convert to smart object), and then right click it and select “duplicate layer”. make sure the document you’re duplicating to is the one with your layout in it.
layers automatically duplicate aligned into the top left corner. since this is where my first panel is, i can just leave my gif there, but for the other ones, drag your gifs into place using transform and your mouse (once again making sure that snapping is on).
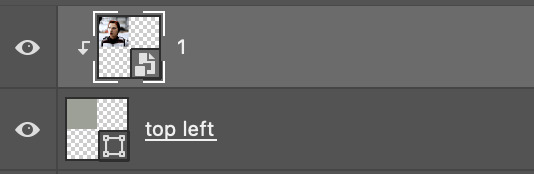
now to get rid of those extra pixels. this step also makes sure your gif is perfectly in line with the shape you’ve outlined the layout with. make sure your gif is right above the shape layer in the layers tab, and then right click and select “create clipping mask”. this makes sure your gif doesn’t go outside the limits of your guidelines. this is what it should look like in the layers tab:
「 step 4: exporting 」 exporting a layout gif is pretty much like exporting any other gif, but you do need to check your matte settings before saving. the wrong ones can make what should be the transparent dividers solid, which can throw off the look of your gifs. make sure matte is set to “none”, and then save as normal!

here's my finished gif:
happy giffing! feel free to send me an ask/message me w any questions!
#gif tutorial#gif tutorials#allresources#completeresources#userchibi#userpjo#uservivaldi#userraffa#userbess#usermorgan#tuserheidi#userrobin#userkosmos#usershreyu#userzaynab#userisaiah#thingschanged#rogerhealey#*mine
269 notes
·
View notes
Note
hi! do u mind explaining how u did the square overlay in this set? thank u sm 🫶🏽
hi sorry for taking so long to answer. i hope this helps and makes sense (if you have any other questions feel free to ask or I could even send you the psd if you want). tutorial below the cut as it's image heavy :)
So basically I started with my 2 gifs at 540x540 pixels. This isn't essential, but I'll also note that when I crop the gifs I like to uncheck the "Delete Cropped Pixels" box so that I can move them around after cropping in case I don't like how it was cropped initially.
For this gifset I ended up putting the two gifs and their colourings in a group with clipping masks for the colouring layers (curves, vibrance, etc). Making the two gifs into smart objects would also work and would be my usual preferred method, but for this particular set it was easier to use the groups so I could keep the colouring of the you weren't a maybe speech.
Once the gifs are overlayed on top of each other only the top gif should be visible (as below)
To create the grid effect there are some tutorials for versions of photoshop which have a setting where you can just input the configuration you want (e.g 4x4) and it will draw up the guides for you. Here is the initial tutorial I saw showing how to do that and another one I found just now which outlines the exact same grid effect as in my set. This way is easier than the way I did it, but my photoshop doesn't have the option 😭
For mine I created a New Guide by following the menu path "View > New Guide"
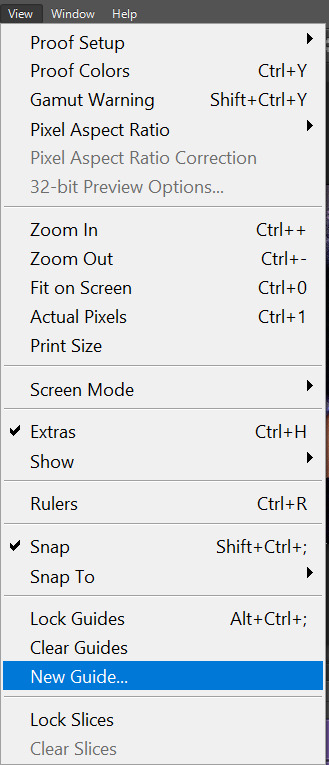
This opens up a dialog box that looks like this

As the guide menu is in cm I doubled checked what the size of the canvas is in cm. A 540 x 540 px canvas comes to 19.05 cm. I wanted to draw a 4x4 guide, so to start I divided 19.05 by 4. This comes to 4.76, so I input this value into the box and clicked ok.

To draw the other lines I just added 4.76 to each previous line drawn so that the lines were even. The guides ended up being (4.76, 9.52 and 14.28). I then repeated the same numbers but with the Vertical orientation button selected.
This gives you a guide which looks like this:

To start exposing the other gif I grabbed the rectangle select tool and started selecting the areas I wanted to mask. The tool should snap to the guides so it is fairly easy to stay within the squares.

Then I just masked over it with a black paintbrush

I continued on with this until I was happy with how it looked - this was my final result
And this is how my layer mask looked
To draw the lines I then selected the line tool and set it to white and 2px. To draw them I held down the shift button, which allowed me to snap the line I'm drawing directly on top of the guides and continue with it as all one shape.
When you draw on top of the guides they go orange
I then toggled the guide off by pushing ctrl + ;
I checked to make sure all the boxes and lines were aligned properly and just cleaned up the gifs by using the selection box and masking until it was perfect (as I'm very type A)
I set the line layer to "Lighten" blending mode and an opacity of 70% as I thought it looked better.
Then I just added the text and moved it around how I pleased.
#asks#resources#tutorials#ps help#usergif#completeresources#allresources#i really hope this makes sense and helps :)
86 notes
·
View notes
Text
Weekly News for Designers № 719
New Post has been published on https://thedigitalinsider.com/weekly-news-for-designers-%e2%84%96-719/
Weekly News for Designers № 719
Figma AI Updates to Elevate Your Design Workflow Figma has shared some prototypes for platform updates that integrate AI. This Tuts+ article covers each of them to explore their possibilities.
State of Brand Report 2023 Discover key insights into the trends, challenges and strategies of branding this year.
Internet Artifacts Explore artifacts from the early days of the internet right up until the present day.
Naming Variables In CSS Some collected thoughts from Jonathan Dallas related to naming CSS Custom Properties.
The Negative Impact of Mobile-First Web Design on Desktop Mobile-first web designs cause significant usability issues when viewed on desktop.
Free T-Shirt Mockup Templates for Photoshop These free realistic iPhone mockup templates are perfect for showcasing the UI or UX of your mobile app design or responsive website.
Introducing Learn Performance Course This is new and free course is intended for those that care about web performance, but may be just beginning to get familiar with it.
It’s 2023, Here is Why Your Web Design Sucks Heather Buchel explores the reasons why we no longer have web designers.
State of React 2023
Let’s Reinvent the Wheel
The 2023 Design Tools Survey This survey gathers usage data from thousands of designers each year and many of the design companies you know use this data to better understand and improve the design tools industry.
CSS & JavaScript Snippets for Creating Notification UIs A collection of CSS and JavaScript code snippets for creating unique notification and alert systems and UIs.
Image Layer Animations with Clip-Path Some ideas for speedy page transition animations with layered images using clip-path.
Common Questions About Interpreting Page Speed Reports Take a closer look at how various performance tools audit and report on performance metrics, such as core web vitals.
Geist Font A new and free typeface that has been specifically designed for developers and designers.
Photoshop Action Sets for Cinema & Movie Effects A collection of one-click cinema & movie effect Photoshop action sets that will take your photos to the next level.
#2023#ai#amp#animations#app#Article#audit#Branding#clip-path#code#Companies#course#CSS#custom properties#data#Design#Designer News#designers#desktop#developers#effects#figma#how#Ideas#images#Industry#insights#Internet#iPhone#issues
2 notes
·
View notes
Photo
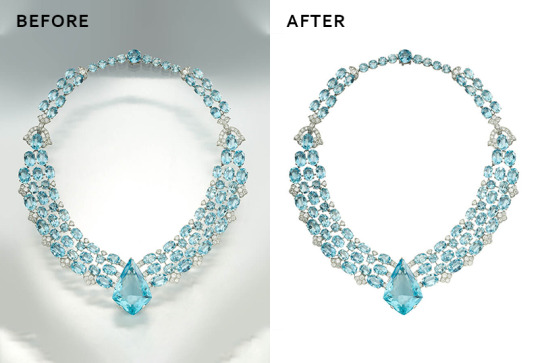
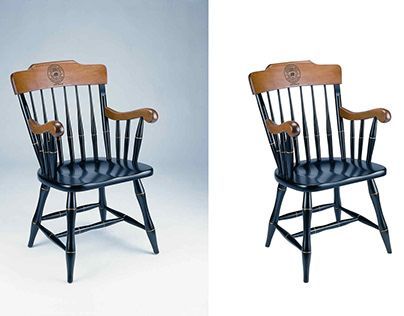
Unlock the Power of Photoshop: A Step-by-Step Guide to Creating Clipping Path Easily.
7 notes
·
View notes
Text
Clipping Path: An Essential Tool for E-Commerce Photo Editing Services
Images play a crucial role in today's digital world, especially in industries such as E-commerce Image Editing Services, advertising, and graphic design. In the world of visual content, the quality and presentation of images can make or break a business's online presence. That's where image editing techniques come into play, and one of the fundamental tools used by proficient content writers and graphic designers is the clipping path.

A clipping path, in simple terms, is a technique used to remove the background of an image or isolate a specific object from its surroundings. It involves creating a vector path around the object's edges using specialized software like Adobe Photoshop. This path then acts as a mask, allowing the designated object to be placed on any background or integrated seamlessly into various designs.
Importance in Image Editing
Clipping path is a crucial aspect of image editing as it provides precision and flexibility in handling images. It enables content writers and designers to manipulate images, remove unwanted elements, and enhance the overall visual appeal, making it an indispensable tool for creating compelling content.
Types of Clipping Paths
Basic Clipping Path
The basic clipping path service is the foundation of all clipping paths. It involves creating a simple outline around an object with straight edges, making it ideal for objects with simple shapes like books, smartphones, or boxes.
Compound Clipping Path
The compound clipping path comes into play when an object has multiple holes or embedded transparency. This type of path requires more intricate techniques to ensure a seamless background removal services, commonly used for jewelry or complex product images.
Complex Clipping Path
The complex clipping path is the most intricate form and is used for objects with intricate shapes or multiple edges. Examples include furry animals, intricate clothing, or detailed machinery.
How Clipping Path Works
Tools and Software
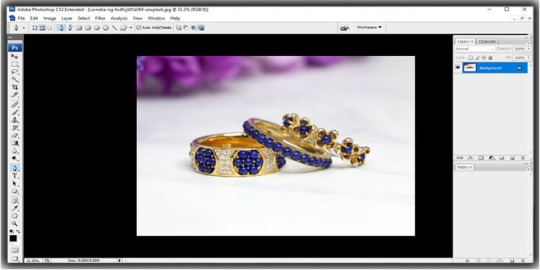
To execute a clipping path, you need software equipped with suitable tools, and Adobe Photoshop stands out as the industry standard. The Pen Tool, in particular, plays a vital role in creating precise paths.
Step-by-Step Process
1. Open the image in Adobe Photoshop.
2. Select the Pen Tool and carefully trace the object's outline.
3. Create a path around the object, ensuring smooth curves and accurate edges.
4. Once the path is complete, apply the clipping path to isolate the object.
Advantages of Clipping Path Services
Photo Retouching
Clipping path services allow for easy photo retouching, enabling writers and designers to enhance the appearance of products or models by removing imperfections.
Background Removal
By removing the background using clipping paths, content writers can place objects on various backgrounds, creating a consistent and visually appealing look.
Creating Unique Image Effects
Clipping path services enable designers to apply various effects and filters to isolated objects, enhancing their visual impact.
Industries Using Clipping Path
Ecommerce Photo Editing Services
E-commerce Photo Editing Services websites heavily rely on clipping path services to present their products with clean and professional images.
Advertising and Marketing
In the advertising and marketing industry, Best Clipping Path Services are employed to create eye-catching visuals for promotional materials.
Graphic Design
Graphic designers use clipping paths to compose stunning layouts and designs, combining different elements seamlessly.
Photography
Photographers utilize clipping path techniques to improve their images and create unique effects during post-processing.
Choosing the Right Clipping Path Service Provider
Experience and Expertise
Look for service providers with a proven track record and expertise in handling various types of clipping paths.
Turnaround Time
Consider the turnaround time offered by the service provider to meet your project deadlines.
Pricing
Compare prices from different providers to find the right balance between quality and affordability.
Customer Reviews
Read customer reviews and testimonials to gauge the service provider's reliability and customer satisfaction.
Tips for DIY Clipping Path
Using Adobe Photoshop
Familiarize yourself with Adobe Photoshop and its Pen Tool to master the art of creating clipping paths.
Pen Tool Mastery
Practice using the Pen Tool to achieve smooth curves and accurate paths.
Refining Edges
Pay attention to refining edges to ensure the isolated object blends naturally with its new background.
Avoiding Common Mistakes in Clipping Path
Rushing the Process
Take your time to create precise paths and ensure high-quality results.
Ignoring Fine Details
Pay attention to small details, as they can make a significant difference in the final output.
Overdoing or Underdoing the Path
Maintain a balance between removing unnecessary elements and preserving essential details.
Future Trends in Clipping Path
AI and Machine Learning in Image Editing
The integration of AI and machine learning algorithms will revolutionize the image editing process, making clipping paths even more efficient and accurate.
Interactive Image Backgrounds
In the future, interactive image backgrounds may become a trend, enabling users to customize the visual environment of products.
Conclusion
Clipping path is an indispensable tool for content writers, designers, and photographers alike. Its ability to isolate objects, remove backgrounds, and create stunning visuals makes it a must-have in the world of image editing. Whether you opt for How to outsource clipping path service or decide to master the technique yourself, the impact of this tool on visual content creation cannot be overstated.
2 notes
·
View notes
Photo

Burger On The Grill
Part 19: Setting the Table--Final Touches
After completing the donut tutorial by Blender Guru, I was challenged to create something similar by myself, so I made a burger. I will make that burger into a meal with a soda and fries.
In the last part, I added a pile of fries. Now, I'll add the final touches to our scene with some background textures, stage lighting and camera effects.
Near the end of a project, there is always a tendency to fiddle around with details that seem to be craving further improvement. In my case, the bun, tomato and lettuce were calling out to me from uncanny valley.
The tomato still looked a bit like rubber or plastic, the lettuce looked like it was made of printer paper and the bun seemed like it might break your teeth if you bit into it. It turns out all of this can be fixed with a few adjustments to the textures.
Understanding Subsurface Scattering
The biggest adjustment needed to be to the Subsurface Scattering. An organic, porous surface will allow light to diffuse beneath the surface leading to a softer appearance.
There are 3 values of concern when it comes to Subsurface Scattering: amount, radius and color. This can lead to a lot of miscombinations when you are testing out values.
How do we choose values that give us the look we want?
Subsurface Color is visible on opaque parts and in shadows. The Subsurface Color can be fed the same value as the Base Color. Doing this avoids color mixing which can lead to unintuitive results.
That subtle tint of color that seems to bounce out of an object with subsurface scattering, which you probably thought was set with the Subsurface Color, is instead determined by the Subsurface Radius. The Subsurface Radius (aka Scatter Color) is visible on edges and translucent parts.
Add a RGB input node and choose your color. For bread, there is a mostly white but slightly yellow color. For lettuce, this color is slightly green. For a tomato, it is a bright, highly saturated red.
Plug this RGB input into the Subsurface Radius. The RGB values represent how deep each color frequency of light penetrates in meters.
The Subsurface amount is used to scale the radius down to realistic values. Values of around 0.01 are normal, since you're scaling from meters to millimeters. A good resource for choosing these values can be found here, where there is a chart of values for 11 different materials.
Fixing Black Articles
As with all things, fixing one problem often creates another. After adjusting subsurface values, the metaballs dew drops on the tomatoes deserted, refusing to appear in renders anymore, and black articles took their place around the edges of the lettuce.
I got rid of the metaballs and recreated the dew drops with the method I described in Part 16.
My dew drops had returned to the field, but what could be done about these jagged intruders?
There were two types of black articles. The first type looked like this:

When your transparency becomes black, you probably have more transparent layers on top of each other than your Cycles render settings currently allow. To fix it, go to Render Properties > Light Paths > Max Bounces and increase the number of Transparent max bounces. For me, increasing this value to 16 eliminated the black articles.
The second type of black article looked like this:

It can be frustrating to see these dark edges after you cleaned up an image in Photoshop and saved it as a PNG with transparency enabled. I learned a good deal more than I probably needed to know about image format and unassociated alpha while researching this problem.
There is an easy fix for this in Eevee, which I mentioned in Part 7. To clip off these unsightly edges, go to Materials > Viewport Display > Settings > Blender Mod > Alpha Clip.
In Cycles, the fix requires a little more math. The dark edges can be clipped by adding a Math node between the connection of the Alpha socket of the Image Texture and the Alpha socket of the Principled BSDF Shader. Set this Math node to Greater Than and let the Threshold be 0.5.
To further spruce up the lettuce, I fed the Image Texture into a Bump node with Strength of 0.2 and fed this into the Normal input. I also set Transmission to 0.275, Specular to 0.317 and Roughness to 0.4.

Now that the calls from uncanny valley have subsided, it is time to dress up the textures for the table and wall.
Texturing the Background
For the table, I downloaded a free texture from Poliigon for wood flooring. Since the table is mostly covered up but still in the foreground, I decided on a 2K quality.
I connected COL to Base Color, GLOSS to Specular and REFL to Roughness. I fed DISP through an inverted Bump node and into Normal. On the Mapping node, I Rotated Y 90deg and Scaled Y and Z by 50.

For the wall, I downloaded another free texture for bricks. Since the wall is in the background and will be later by blurred by the depth of field, I decided on a 1K quality.
Again, I connected COL to Base Color, GLOSS to Specular and REFL to Roughness. I fed NRM through a Normal Map node into Normal. Last, I fed DISP through a Displacement Node and into the Displacement socket of the Material Output.

Because I am using real Displacement this time instead of faking it with Bump, I actually have to add geometry for it to show up on the wall.
Add a Subdivision Modifier. Set it to Simple and check Adaptive Subdivision. If this option does not show up, go to Render Properties and set Feature Set to Experimental.
Understanding Adaptive Subdivision
Adaptive Subdivision is a great tool for adding microdisplacements, but it can get you in trouble when it comes time to render if you don't quite understand the numbers you are choosing for the Dicing Scale and Levels Viewport. I encountered 17 hour renders and even some that failed before I figured out what I was doing wrong.
It can help to visualize the subdivisions you are making before you press that render button.
Select the offending material and add the following node setup:

Add a Wireframe input node and connect it to an Emission shader. Use a Mix Shader to mix the Emission shader with the Principled BSDF shader you already made. Now white lines should should up over your material in the preview menu showing you just how many subdivisions you are set up for. You may want to check Pixel Size and adjust the Size to make the lines thinner and more sharp.
Make sure Levels Viewport is set to 0. I read that this value does not affect render, but this is not what my experimentation showed. When set to something other than 0, it seems to override the adaptive nature of the subdivision.
So that you aren't biting off more than your computer can chew with the Dicing Scale, head over to Render Properties > Subdivision and set the Viewport to match the Dicing Rate Render at 1px. Now, what you see is what you get.
Unless the microdetail is focused in the foreground of the image, you probably don't want a Dicing Scale less than 1px. Study the white wireframe overlay and trust your gut.
For the wall, I chose a Dicing Scale of 16px, for the serving paper, I chose a value of 8px, and for the fries, I chose a value of 1px.
Optimizing Memory for Render
The simplest way to save memory is by the use of linked duplicates. This is when several objects share the same mesh data. I only modeled 3 variations of fries, so I really only needed 3 meshes.
To convert the fries into linked duplicates, select a Small fry near the foreground of the image and rename the mesh to Fry_S. Select all of the Small fries, and make sure that the one with the renamed mesh is the active object. In Object Mode, hit Ctrl+L and select Object Data.
Now, all of the selected fries share the same mesh data. Do the same for the Medium and Long fries.
Since the fries were such a memory hog even after linking them, I sorted them into 3 groups: those hidden by occlusion from the camera, those mostly hidden from the camera, and those clearly visible.
The occluded fries could be disabled without any visible change to the render. For the fries mostly hidden from the camera, I removed the Adaptive Subdivision modifier, which removed the microdisplacement. I left the visible fries as they were.
The bubbles on the bottom of the soda could also be disabled since the bottom of the glass was occluded by the pile of french fries and would not be visible in the render.

All of these adjustments reduced the render time from 17 hours down to 1 hour! This shocked me but really drove home how much optimizing can save you in time and money; I was worried I'd have to buy more VRAM.
Improving the Lighting
So far, my scene has been rendered with pretty basic lighting: one point light and an HDRI.
I downloaded the HDRI of a small studio for the soda render in Part 15. I found it helped to define the glass against the background by highlighting the sides.
Under World Properties, click on the field next to Color and select Environment Texture. Open the Shader Editor, set the type to World and set up the nodes as in the image below. You can adjust the rotation and strength to your liking. I set the strength to 0.25.

Using the principle of 3 Point Lighting, I set up an area light as the key light with a power of 1250W and positioned it front-left of the scene. I chose a color with a red hue, low saturation and high brightness. This light casts a bright highlight on the glass.
For the secondary light, I set up a point light with a power of 5000W and positioned it front-right of the scene. I chose a color with an orange hue, high saturation and high brightness. This light adds a warm glow to the scene.
For the back light, I set up a spot light with a power of 100W and positioned it over the scene to cast its light down the brick wall. I chose a color with a red-orange hue, high saturation and high brightness. This light brightens the brick wall, increasing contrast between the wall and the dark soda glass in front of it. It also adds an interesting gradient to the background which serves to frame the scene.

Adding Depth of Field
In the renders so far, everything in the scene has been in sharp focus and filled with detail. It is a lot to take in, and most people won't have the patience to sit and stare at your image like you did while you were making it. They want to know the story in a glance, skim the cliff notes rather than read the novel. The artist can help with this.
To emphasize the focal area of the image, the camera can be set to blur other areas. The viewer's eye will be drawn to the area with the most crisp detail. This is called Depth of Field.
Select your camera. Under Object Data Properties, check Depth of Field. You can choose a Focus Object or set a Distance like I did. I set a Distance of 0.48m, which is about where the burger starts.
Most of the image becomes blurred, but what if you want to show off more of the detail you slaved over on the glass?
To enlarge your focal area and control how much of your image is blurred, go to Aperture and adjust the F-Stop. Higher values increase the area of focus. I set F-Stop to 11. The image at the top of this post shows the final effect.
This marks the end of this tutorial series. I am so glad to finally be done!
Follow me to keep watch for the final part. I will add a guide with links for fast access to all of the tutorial parts.
Review the previous part.
See overview for links to all parts of this tutorial series!
See more of my work: Check out my archive.
Join me on my journey: Follow me on tumblr.
Support my creative profession: Buy me a coffee on KoFi.
#blender#tutorial#burger#meal#subsurface scattering#microdisplacement#lighting#texturing#3d art#art process#food art#3d artist#art#blenderguru#digital art#3d render#blender3d#blendercommunity#blendertutorial
3 notes
·
View notes
Text
Professional Clipping Path & Photo Editing Service in Europe 2025
High-quality images are key for a strong impression. Whether you run an eCommerce store, manage a fashion brand, or handle marketing campaigns, professional edits help you stand out, build trust, and boost sales.
As we enter 2025, the demand for clipping path & photo editing services in Europe is rising. Businesses need precise, high-quality edits to compete in a visual market. This article explores the importance of these services, who benefits, and how Clipping Klub can enhance your brand’s visuals.
Why Clipping Path Services Matter in 2025
1. Essential for eCommerce & Advertising
With eCommerce growth, product images influence buying decisions. A clean, sharp, professionally edited product photo builds credibility and increases conversions. Striking visuals in ads capture attention and drive engagement.
2. Boosts Brand Identity & Engagement
Well-edited images do more than look good — they strengthen brand identity. Businesses need consistent, high-quality visuals to attract and retain customers, whether it’s a model shoot, product showcase, or promotional banner.
3. Staying Ahead with New Editing Trends
Advancements like AI-assisted editing, high-resolution enhancements, and 3D imaging are changing the photo editing landscape. Companies that invest in modern clipping path techniques gain an edge in Europe’s digital market.
Our Clipping Path & Photo Editing Services
At Clipping Klub, we offer a variety of clipping paths and photo editing services tailored to different business needs. Our skilled designers use advanced Photoshop techniques to ensure precision and quality in every edit.
1. Clipping Path Services
Basic Clipping Path — Simple cutouts for smooth edges
Complex Clipping Path — Detailed cutouts for intricate items like jewelry
Multi-layer Clipping Path — Layered edits for color correction and design tweaks
2. Background Removal Services
Transparent Background — Perfect for eCommerce listings
White Background — Meets Amazon & eBay standards
Custom Backgrounds — Fits your brand’s style
3. Image Retouching
Beauty Retouching — Smooth skin and enhance features
Product Retouching — Remove flaws and enhance details
Jewelry & Fashion Retouching — Add shine and adjust colours
4. Shadow & Reflection Effects
Drop Shadows — Adds depth and realism
Mirror Reflection — Enhances product visuals
Natural Shadows — Makes images lifelike
5. Color Correction & Enhancement
Adjust brightness, contrast, and saturation
Recolour objects and replace colors
HDR photo enhancements for better detail
6. Ghost Mannequin & Neck Joint
3D ghost mannequin effect — Ideal for apparel photography
Invisible mannequin editing — Creates a seamless look
Smooth neck joint adjustments — Improves product presentation
Who We Work With
We provide customized image editing solutions for businesses across various industries in Europe:
eCommerce & Retailers — Amazon, eBay, Shopify sellers
Fashion & Apparel Brands — High-end clothing & accessories
Photographers & Studios — Professional editing support
Advertising & Marketing Agencies — High-quality visuals for campaigns
Printing & Publishing — Magazines, catalogs & promotional materials
Why Choose Clipping Klub?
✔ Skilled Designers — Our experts edit images manually for precision and quality. ✔ Fast Turnaround — Quick delivery without sacrificing detail. ✔ Affordable Pricing — Competitive rates, even for bulk orders. ✔ Secure File Handling — Your data is safe with us. ✔ Satisfaction Guaranteed — We ensure your images are flawless.
How It Works
Upload Your Images — Share your raw files with us.
We Edit with Precision — Our experts enhance your images.
Quality Check & Review — You can request changes if needed.
Final Delivery — Get your high-resolution, ready-to-use images.
Future of Photo Editing in Europe (2025)
AI & Automation in Editing
AI speeds up editing, but human expertise is essential for precise tasks like clipping paths and retouching.
High-Resolution eCommerce Images
With 4K screens and ultra-HD displays, brands need flawless, high-resolution images for an immersive customer experience.
Demand for 3D & Interactive Visuals
More brands use 360-degree product photography and 3D imaging to create engaging shopping experiences.
Get Started with Professional Clipping Path & Photo Editing Today
If you’re seeking high-quality clipping path & photo editing services in Europe, Clipping Klub is here to help! We ensure your images are professional, polished, and ready to make an impact.
📩 Contact us today for a free trial or visit Clipping Klub to learn more about our services.
0 notes
Text
Proven tips How to Make Your Product Photography Stand Out
Ecommerce Photo Editing Service plays a crucial role in online business success, as high-quality product images significantly impact conversions on platforms like Amazon, Etsy, and your website. The right images not only showcase products effectively but also align with your brand identity. However, the real transformation occurs during the editing process, where expert techniques enhance the final presentation.
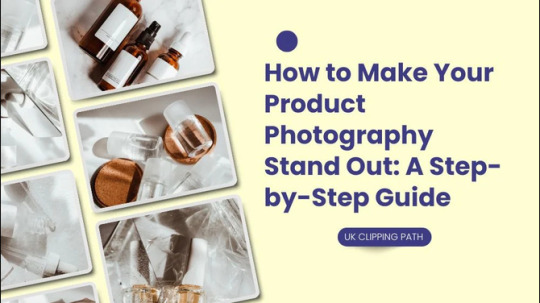
Make Your Product Photography Stand Out
Step 1: Plan Your Product Photography
Success starts with strategic planning. Careful preparation simplifies the editing process and improves final outcomes.
Understand Your Brand’s Visual Identity Your product images should reflect your brand’s aesthetic. Whether you follow a minimalist, vintage, or luxurious design, aligning photography with your brand identity strengthens marketing consistency.
Choose the Right Background
White Background: Ideal for Amazon and eBay, ensuring the product stands out.
Neutral or Solid Colors: Works well for brands preferring a sleek, uncluttered look.
Lifestyle Backgrounds: Show products in real-life settings, helping customers visualize their use.
Lighting is Crucial Proper lighting prevents harsh shadows and enhances product details.
Natural Light: Soft and even illumination.
Softbox Lighting: Ideal for controlled studio settings.
Ring Lights: Useful for jewelry and small objects.
Composition and Framing Utilize the rule of thirds to create balanced, visually appealing compositions. Capture multiple angles to showcase all product details.
Step 2: Capture High-Quality Images
Use a High-Resolution Camera DSLR or mirrorless cameras provide superior quality compared to phone cameras. Opt for at least 20 megapixels for detailed images.
Shoot in RAW Format RAW images retain more data, allowing for better post-production flexibility.
Focus on the Details Highlight product features using a macro lens or zoom function.
Avoid Using Flash Flash can cause unwanted reflections. Instead, use diffused lighting and adjust brightness in post-production.
Step 3: Post-Processing Your Images
After capturing images, editing refines them for a professional finish. Many photographers rely on UK Clipping Path for expert image enhancements.
Adjust Exposure and White Balance Ensure balanced exposure and accurate color representation to maintain authenticity.
Remove Background Clutter Distracting backgrounds can be eliminated using UK Clipping Path’s background removal services, ensuring clean, professional images.
Color Correction and Enhancement Adjust saturation, contrast, and vibrancy to make products visually appealing. Enhancing colors restores fabric vibrancy or highlights textures in wood and metal.
Retouching and Removing Imperfections Eliminate dust, scratches, and other distractions using Photoshop or Lightroom tools.
Sharpening the Image Enhancing clarity ensures product details remain crisp and visible to customers.
Step 4: Advanced Editing Techniques
To make product images truly stand out, advanced techniques refine them further.
Clipping Path and Image Masking For intricate edges like jewelry or shoes, UK Clipping Path provides precise clipping path services, ensuring smooth, clean borders.
Reflection Effects Adding subtle reflections creates a high-end, polished appearance, particularly for watches, jewelry, and footwear.
Drop Shadows and 3D Effects Adding shadows and 3D effects makes products pop, improving visual impact on websites and marketplaces.
Step 5: Consistency Across All Product Images
A cohesive visual presentation strengthens brand recognition and customer trust.
Standardizing Image Dimensions Maintain uniform image sizes and resolutions to ensure professional consistency across platforms.
Consistent Editing Style Apply a uniform editing style—whether bright and vibrant, muted, or monochrome—to reinforce your brand identity.
Step 6: Professional Image Editing Services
For businesses managing multiple products, professional editing services like UK Clipping Path ensure efficiency and quality.
Clipping Path for Flawless Product Images Precise cutouts help remove distractions and highlight intricate product details.
Bulk Image Editing Handling large inventories is streamlined with UK Clipping Path, allowing businesses to process hundreds of images efficiently.
Affordable and Quick Turnaround Get high-quality editing at competitive prices with fast delivery to meet market demands.
Customized Services for Your Needs From background removal to advanced retouching, services are tailored to suit small businesses and large-scale enterprises alike.
Conclusion
In today’s competitive eCommerce landscape, ecommerce photo editing services are essential for capturing consumer attention. From planning to advanced editing, high-quality product photography enhances brand perception and boosts sales.
UK Clipping Path delivers expert editing services, including background removal, clipping path, and professional photo retouching, ensuring that your product images stand out. Investing in premium photography and expert editing helps elevate your brand above competitors, driving better engagement and conversions. Give us a free trial to show our skill.
0 notes
Text
Clipping Path Service in Photoshop: A Complete Guide
What is the Clipping Path Service in Photoshop?
A clipping path service is a photo editing technique used in Adobe Photoshop to isolate objects from their backgrounds. This process involves using the Pen Tool to create precise selections around an object, ensuring a clean cutout. Clipping paths are essential for e-commerce, photography, graphic design, and print media, where high-quality product images are necessary for professional presentations.
The clipping path service is widely used for background removal, color change, and image manipulation. Businesses and individuals use this service to enhance product images, ensuring a sharp and professional look.
How Does the Clipping Path Service Work?
The clipping path technique is performed manually in Photoshop using the Pen Tool. Here's a step-by-step breakdown of how it works:
Selecting the Object – The editor uses the Pen Tool to draw a precise path around the object that needs to be isolated.
Creating a Path Layer – Once the path is complete, it is saved as a Path Layer in the Layers panel.
Removing the Background – The selected area is then separated from the background, making it transparent or replaceable with a new background.
Final Touches – Additional image manipulation services, such as shadow creation, color correction, and vector conversion, may be applied for better results.
Types of Clipping Path Services
There are different levels of clipping path services, depending on the complexity of the object:
Basic Clipping Path – Used for simple objects with straight or minimal curved edges, such as mobile phones and books.
Simple Clipping Path – Suitable for slightly complex shapes like watches, shoes, and bottles.
Medium Clipping Path – Used for objects with multiple curves, such as clothing, furniture, and handbags.
Complex Clipping Path – Required for intricate objects with multiple holes, such as jewelry, bicycles, and flowers.
Super Complex Clipping Path – Applied to highly detailed objects like human hair, trees, and netted products.
Benefits of Using a Clipping Path Service
Using a clipping path service provides several advantages, especially for businesses that rely on high-quality images:
Professional Background Removal – Ensures a clean and precise cutout.
Better Image Customization – Allows easy replacement of backgrounds and customization.
Improved Product Presentation – Enhances e-commerce images for a more appealing look.
Supports Other Editing Services – Works well with image masking services, color correction, and shadow creation.
Boosts Marketing and Branding – High-quality images attract customers and increase sales.
Related Services with Clipping Path
1. Color Change Service
This service allows you to change the color of products without needing to take multiple photos. It is widely used in e-commerce and fashion photography to display product variations.
2. Vector Conversion Service
A vector conversion service converts raster images into scalable vector graphics. This is essential for logos, banners, and print materials, ensuring high-quality resolution at any size.
3. Image Manipulation Service
An image manipulation service involves advanced editing techniques such as photo retouching, background replacement, and creative transformations. This service is commonly used in advertising and marketing.
4. Image Masking Service
For images with fine details like hair, fur, or transparent objects, a clipping path service alone is not enough. An image masking service is used to ensure smooth and natural cutouts.
5. Shadow Creation Service
To add a realistic effect to product images, a shadow creation service is applied. This includes drop shadows, reflection shadows, and natural shadows, enhancing the depth and realism of an image.
6. Color Correction Service
A color correction service is used to adjust brightness, contrast, saturation, and color balance. It ensures that the product's colors remain accurate and appealing.
Who Needs Clipping Path Services?
A clipping path service is beneficial for various industries, including:
E-commerce Businesses – For clean product images on websites like Amazon and eBay.
Photographers – For retouching and enhancing images.
Graphic Designers – For creating professional visuals.
Printing Companies – For preparing high-quality print materials.
Marketing Agencies – For promotional images and advertisements.
Final Thoughts
A clipping path service in Photoshop is an essential tool for high-quality image editing. Whether you need background removal, color change, vector conversion, or image manipulation, this service plays a crucial role in creating professional visuals. With additional services like image masking, shadow creation, and color correction, you can enhance your photos for marketing, branding, and e-commerce success.
If you're looking for professional clipping path services, hiring an expert ensures accuracy and efficiency, saving you time and effort while delivering top-notch results.
Company Information:
Website: https://clippingace.com/
Facebook: https://www.facebook.com/clippingace
Contact : https://clippingace.com/contact/
Resources: https://clippingace.com/clipping-ace-blog/
Youtube: https://www.youtube.com/channel/UCoRU-n9L3Rt1zZYtR6Unozw
Twitter: https://twitter.com/Clippingace
Quote: https://clippingace.com/request-a-quote/
Pinterest: https://www.pinterest.com/clippingace/
Instagram: https://www.instagram.com/clippingace.graphics/
Linkedin: https://www.linkedin.com/showcase/clippingace/
Office Address
Canada
(Client Support)
80 Barbados Blvd
Scarborough on M1J1K9
Toronto Canada
14374342120
14374342125
Bangladesh
(Head Office)
183 Green Rd
Dhaka 1205
Bangladesh
8801730087159
8801793463556
0 notes
Text
Did you know that clipping path services are a game-changer for businesses across industries? 🤔 From e-commerce to fashion, photography, and advertising, this versatile tool helps create flawless product images, enhance marketing materials, and streamline workflows. Learn how businesses use clipping paths to achieve professional, high-quality visuals that drive sales and elevate brand identity. Dive into the full blog post to explore all the amazing uses of clipping path services today! 💻📸
#ClippingPath#PhotoEditing#EcommerceTips#BusinessGrowth#MarketingDesign#ProfessionalPhotos#VisualBranding
0 notes
Text
Understanding How Clip Path Works in Image Editing Services
Introduction:
In the world of digital image editing, the term "clip path" plays a crucial role. Whether you are dealing with clipping path services, vector conversion services, or background removal, understanding how clip path works is essential. Businesses and individuals rely on professional clipping path service providers to enhance their images for e-commerce, advertising, and branding purposes. In this article, we will explore how clip path works, its applications, and how it benefits services like image masking, drop shadow, and ghost mannequin effects.
What is a Clip Path? A clip path is a vector path used to isolate a subject from its background. It is commonly created using software like Adobe Photoshop or Illustrator, allowing designers to separate an object from an image with precision. The clipped portion remains visible, while the background can be removed or replaced.
Clip paths are primarily used in product photography, fashion photography, and marketing materials where clean and professional images are required. Clipping path services ensure that images appear polished, increasing their visual appeal and effectiveness.
How Clip Path Works : The process of creating a clip path involves several steps:
Selection of the Object – The designer carefully selects the object that needs to be isolated from the image.
Creating a Vector Path – Using the Pen Tool in Photoshop or Illustrator, the designer draws a path around the subject.
Applying the Path – Once the path is complete, it is converted into a selection.
Background Removal or Editing – The background is either removed or replaced with a new one, depending on the client’s requirements.
Since the clip path is a vector, it maintains high accuracy and can be edited without loss of quality, making it an ideal solution for image editing needs.
Applications of Clipping Path Services: Clipping path services are widely used across various industries. Here are some key applications:
E-commerce and Product Photography – Online stores use clipping paths to remove backgrounds and maintain uniformity in product listings.
Advertising and Marketing – High-quality images with clean edges enhance advertisements and promotional materials.
Print Media – Magazines, brochures, and posters require precise cutouts for professional designs.
Fashion and Apparel – Ghost mannequin services use clipping paths to create a 3D effect on clothing items.
Jewelry and Accessories – Complex clipping paths help in refining intricate details of jewelry images.
Related Services Utilizing Clip Path: Many other image editing services integrate clip path techniques to enhance visual presentations:
Vector Conversion Service: Clipping paths help in converting raster images into vector graphics, ensuring scalability and better quality.
Image Masking Service: When an image has complex edges, such as hair or fur, masking techniques complement clipping paths to ensure detailed extraction.
Drop Shadow Service: Clipping paths allow designers to apply realistic shadows to isolated objects, improving depth and realism.
Ghost Mannequin Service: This technique is used to create a hollow effect for apparel images, making them appear as if worn by an invisible mannequin.
Why Choose a Professional Clipping Path Service Provider?: A professional clipping path service provider ensures high-quality image editing with precision and efficiency. Here’s why hiring experts is beneficial:
Accuracy and Precision – Professional designers use advanced tools to create seamless cutouts.
Time-Saving – Businesses can focus on core activities while experts handle image editing tasks.
Consistent Quality – High-end retouching ensures that images are visually appealing and professional.
Bulk Processing – Service providers can handle large volumes of images efficiently.
Conclusion: Clip path technology is a fundamental aspect of digital image editing, enabling precise cutouts, background removal, and high-quality visual enhancement. Whether you need clipping path services, vector conversion, or ghost mannequin effects, professional service providers can help deliver polished and professional images tailored to your needs. Investing in expert image editing ensures better engagement, improved branding, and a strong visual impact in the competitive market.
Company Information:
Website: https://clippingpathzone.com/
Facebook: https://www.facebook.com/clippingpathzone/
Contact : https://clippingpathzone.com/contacts/
Resources: https://clippingpathzone.com/blog/
Pinterest: https://www.pinterest.com/cpzmedia/
Twitter: https://www.linkedin.com/in/clipping-path-zone-187698137/
Quote: https://clippingpathzone.com/request-to-get-a-quote/
Skype: skype:Clippingpathzone?chat
Office Address:
United States Office
30 North Gould Street, Sheridan, WY 82801
19173362276
Bangladesh Office
1188/1, East Shewrapara, Mirpur, Dhaka-1216 Bangladesh
8801612348152
0 notes
Text
Understanding Multiple Clipping Path: Benefits & Services Explained

In today’s digital world, where images play a vital role in online marketing, e-commerce, and advertising, the need for high-quality visuals has never been more critical. Professionals in the photography, e-commerce, and graphic design industries often rely on image editing services to enhance the quality of their photos. Among these services, clipping path and its advanced variations have gained immense popularity. One of the most essential techniques in image editing is the multiple clipping path, a powerful tool that helps businesses achieve professional and flawless product images. This article will explore the concept of multiple clipping paths, its importance, and how various services like background removal, ghost mannequin, and drop shadow services are interconnected.
What is Multiple Clipping Path?
A multiple clipping path refers to a technique in image editing where more than one area of an image is isolated and edited separately using clipping paths. Unlike a standard clipping path, which is used to isolate a single object or area, multiple clipping paths allow for intricate edits of different sections of an image. These paths are created using vector-based tools, primarily Adobe Photoshop, to separate parts of an image into layers, enabling individual adjustments like color correction, exposure, or shadow effects.
This method is especially beneficial when working with product images, where each element in a photograph may need distinct editing to enhance its visual appeal. For instance, a garment photograph might require different paths for the sleeves, body, and buttons, allowing for separate color changes or removal of unwanted elements.
Benefits of Multiple Clipping Path
Precision and Control: With multiple clipping paths, editors can manipulate specific sections of an image without affecting other areas. This precision leads to a more polished and professional final result.
Flexibility: Multiple clipping paths offer immense flexibility by providing the ability to edit and enhance each part of an image independently. Whether it's adjusting colors, brightness, or shadows, this technique gives editors full creative control over each element.
Time-Efficiency: Instead of starting from scratch every time you need to adjust a particular part of an image, multiple clipping paths allow you to save time and resources by focusing on specific areas that need tweaking.
Enhanced Product Images: For businesses in e-commerce, having images with well-edited and clean product displays can increase the visual appeal and, subsequently, sales. Multiple clipping paths enhance product images by allowing detailed edits without the risk of altering the overall image quality.
How Multiple Clipping Path Service Works
The process of providing multiple clipping path services is fairly straightforward. First, an image is selected, and the clipping path is drawn around various objects or areas in the image. Each path is then customized for editing, whether that involves removing the background, adjusting colors, adding shadows, or refining details.
For e-commerce businesses that require images with multiple products or complex compositions, using a clipping path service is invaluable. A background removal service often complements this by offering to isolate products from their backgrounds, leaving the elements ready for further editing or placement on a new background. Many businesses also benefit from ghost mannequin services, where multiple clipping paths are used to refine clothing images, giving them a 3D effect as if the product were being worn by a mannequin.
Related Services: Background Removal, Ghost Mannequin & Drop Shadow
Background Removal Service: This service involves removing the background of an image while keeping the subject intact. When combined with multiple clipping paths, background removal becomes even more precise, ensuring that the image remains clean and professional. This service is perfect for product photography, where the focus needs to be on the product itself.
Ghost Mannequin Service: In fashion photography, the ghost mannequin effect creates the illusion of a person wearing the clothing without actually showing a model. Multiple clipping paths allow for precise editing of the garment sections, enhancing the visual appeal by adjusting each part individually.
Drop Shadow Service: Adding shadows to an image is a great way to create depth and realism. Multiple clipping paths ensure that shadows can be applied to individual items without disturbing other parts of the image. This technique adds dimension to product images, making them more eye-catching and lifelike.
Conclusion
The multiple clipping path service is an indispensable tool in modern image editing, allowing for intricate, precise adjustments to various parts of a photograph. When paired with other services like background removal, ghost mannequin, and drop shadow services, it can help create visually appealing, professional-quality images. Whether you’re an e-commerce business owner, a photographer, or a designer, understanding the benefits and applications of multiple clipping paths will ensure that your images stand out, attract customers, and convey your brand’s message effectively.
Company Information:
Website: https://www.expertclipping.com/
Facebook: https://www.facebook.com/expertclipping
Contact : https://www.expertclipping.com/contact/
Resources: https://www.expertclipping.com/blog/
Youtube: https://www.youtube.com/c/Expertclipping-ec
Twitter: https://twitter.com/expertclipping
Quote: https://www.expertclipping.com/free-quote/
Office Address
UK OFFICE
24 Longbridge Road
Barking Essex IG118tnv
www.expertclipping.co.uk
Phone: 02036093822
24 Longbridge Road
Barking Essex IG118tnv.
E-mail: [email protected]
Phone: +44 02036093822
ITALY OFFICE
168 Belaws, 4th Floor
Via Tolpada 21, 11400
www.expertclipping.com
0 notes